Have you ever wanted to clone yourself in the classroom? Zoom’s breakout rooms are a game-changing feature for leveraging small group work in remote teaching. But, they’re not set up for hosts (instructors) to quickly monitor what’s happening in all the rooms simultaneously. You can fix that, with this workaround that places a clone of yourself in each room.
The Use Case
Zoom, like most teleconferencing platforms, was built for teleconferencing. Everyone can see everyone, and generally only one person talks at a time. That’s fine for teaching a small, intimate seminar or discussion course, but even 10- or 15-student classes can make discussions unwieldy. Enter the breakout rooms feature.
Using breakout rooms, a host can split a meeting into a number of smaller sub-meetings. To its credit, Zoom makes the setup process virtually effortless, so it’s easy to do mid-meeting. However, once participants are in their breakout rooms, the host is left by themselves in a purgatory-like state of isolation in the meeting’s main room.
 Actual photograph of a Zoom host after their breakout rooms have launched.
So how does a host stay active in the meeting when participants are in breakout rooms? By joining each room, one at a time. It’s a laborious process: even with only 4-5 breakout rooms I find it takes 50% longer for me to visit every room than I plan. A not-insignificant portion of that time is spent merely in the lag between leaving one breakout room (please wait…), then arriving back in the main room, then joining the next breakout room (please wait…).
What if you could just see and interact with all the rooms at once?
This is how we manage group work in a busy classroom, after all. We can talk to one group while keeping an eye on the others, we can quickly respond when a group wants our attention, and we can tell instinctively when the groups are generally ready to wrap up. None of those things are easy, or indeed possible, when slowly visiting one group at a time.
So! Without further ado, here is the workaround that I’ve used to make this happen. The basic idea is this: You join your own Zoom meeting multiple times, all from the same computer, and then place one of “you” into each breakout room. Simple, right?
The Breakout Panopticon: Setup Steps
Take these steps just once, before your first panopticon session, and they should be ready for all future sessions.
A. Enable “Join from your Browser” on your Zoom account. You can and should still use the Zoom app to connect your “main” self, the host of the meeting, but each of your clones will be connecting within a web browser window. Not every Zoom feature is available to participants who connect in their browsers, but your clones won’t miss any important ones.
To enable Join from your Browser: In your zoom.us My Account, under the Settings tab, find and enable the option:
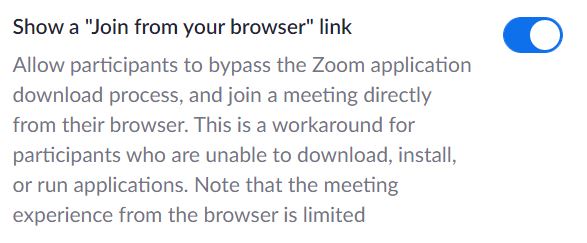 This option is found under the “In Meeting (Advanced)” section of the Settings tab.
B. Disable “Only authenticated users” for Web client connections on your Zoom account. You (probably) don’t have multiple registered Zoom accounts of your own to play with, so your clones will need to be unauthenticated. You’ll be prompted to enter a display name for each of the “yous” when you connect. You only need to disable this option for Web client participants. (If you rely on students connecting through authenticated accounts, the other Only authenticated users can join meetings setting may be left enabled; they appear to be independent of one another.)
To disable Only authenticated users can join meetings from Web client: In your zoom.us My Account, under the Settings tab, find and disable the option:
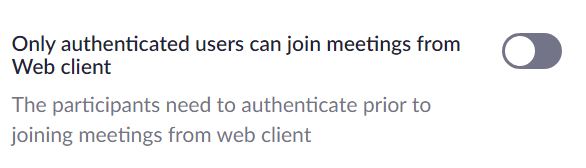 This option is found under the “Security” section of the Settings tab.
That’s all the setup you need before your first panopticon.
The Breakout Panopticon: Before your Meeting
Leave a few extra minutes for these steps when setting up for your panopticon meeting. This is also a place where having a large and/or multiple monitor setup is helpful.
1. Launch your Zoom meeting from your “main” account.
Use the Zoom app and your registered Zoom account.
This is the “real” you, the one that hosts/controls the meeting.
2. Launch a web browser in incognito/private mode.
Google Chrome’s incognito mode (Shift-Ctrl-N) or
Firefox’s Private mode (Shift-Ctrl-P) are good options.
Incognito mode is the secret sauce for this recipe:
Without it, your different “yous” won’t have different identities.
3. Open separate tabs (or, better, windows), one per breakout.
Ensure all your new tabs/windows are likewise incognito/private.
Tabs are the preferred option if you don’t have tons of screen space.
4. In each tab/window, paste the URL of your meeting’s “Join” link.
Fetch this from the ( i ) button in the upper-left of your main Zoom screen, if needed. For your convenience, ensure the link includes the meeting password (it should have a portion that looks like ?pw= followed by a bunch of stuff.)
5. In each tab/window, select the “Join from your browser” option.
Do not select the “Open Zoom Meetings” or “launch meeting” button!
Zoom tries to persuade you to use the app instead – don’t fall for it. You’re already using the app to power your true self, the host of the meeting.
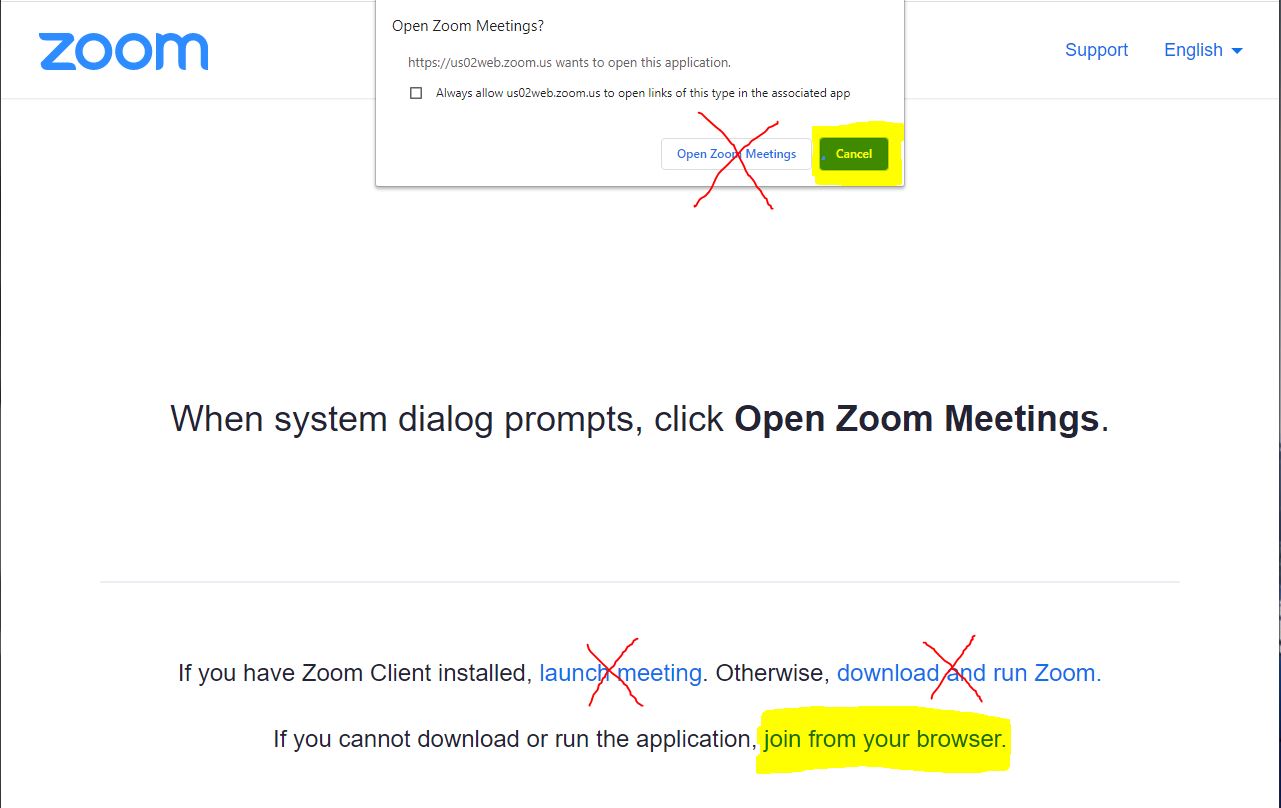 Cancel the popup’s request, then select the bottom-most option, “join from your browser.”
6. In each tab/window, name your clone, and complete the ReCaptcha.
I like to call my clones things like “Dr. S in Group 1,” “Dr. S in Group 2,” etc.
Then, select all pictures with palm trees in them, or whatever, to complete the ReCaptcha necessary to join. Honestly… this is probably the most frustrating part of the setup process. You’ll be a master of image recognition by the end!
7. in each tab/window, “Join with computer audio” but turn off mic/camera.
Each of your clones is a participant in your main meeting for now. So mute them all to avoid creating loud audio feedback in your main meeting room! Be sure you finish the Join with Audio process now: you may be prompted by the browser for control of your microphone. You should see a muted mic (and not headphones) in each window when you’re ready.
Success! Each of your clones is now a silent participant in the meeting, lying in wait for the breakouts to begin. Just remember to subtract them from the participant count, if you’re monitoring that list for attendance purposes.
The Breakout Panopticon: During the Meeting
The setup process has not been particularly fun so far. That all changes when your breakout rooms begin during your meeting.
8. Launch breakout rooms, with one of your clones in each.
Since your clone will be counted by Zoom as a participant, remember to add 1 to your usual group size when forming groups to leave room. (Ex: To have 4 students in each group, plan for groups of 5.) Use the “Move to” option to distribute your clones.

9. During breakout rooms, disable your main-room host audio/video.
This frees up your camera and microphone to interact with the breakout groups.
10. Enjoy watching all your groups work!
As a full participant in the breakout rooms, your clones will see whatever the group in that room is seeing, including participants’ audio and video, and screen sharing.
You can interact with each breakout group in your clones’ browser windows, using any of the available tools, including chat, screen sharing, audio, and video.
Note: Your camera can be used in only one room at a time — as yet, I don’t believe that simulcasting your video into multiple rooms is possible. (I’ll revise this post if I discover a way.) But you can multicast your microphone to be what I called the “voice of God” in multiple rooms at once!
This can be very noisy in the beginning since you’ll be able to hear the audio from all your groups at once! You can either revel in the liveliness of your groups’ simultaneous discussions, or you can unplug one room at a time by choosing to “Leave Computer Audio” from the microphone options menu in each clone’s meeting. Edit: Or better yet, simply ask the browser to mute the tab. Thanks to Tom Mahoney for this suggestion!
 Unplug from a breakout room’s audio by “Leaving computer audio.” You’ll need to re-join computer audio through this same process if you want to hear and speak to a room later.
When it’s time to reconvene in the main room, end the breakout rooms as normal using your meeting host controls. (Be sure you re-enable your camera and microphone in the main room if you’ll be using them again in the main room.)
That’s it!
Until Zoom makes this a regular feature of their app, this workaround can give you a 360-degree view of the activities in each of your meeting breakout rooms.
As a final note, this process can be taxing on your internet bandwidth. (It’s the equivalent of having multiple people participating in simultaneous Zoom meetings on your same internet connection.) So if there is a weak link in using this technique, if you experience poor performance, or — worst case — if your main-room host audio and video suffer quality issues, this is likely the reason. This may also be one of the obstacles to Zoom implementing this function natively. I’m not aware of a workaround for this: it would be nice if Zoom permitted Web client connections to select bandwidth-throttling options.
Thanks for the clear explanation! This is such a necessary feature for teacher oversight of groupwork, don’t know why Zoom haven’t enabled it as a core function of breakout rooms.