I’ve made this much longer than usual because I have not had time to make it shorter.
– Blaise Pascal
Since I started making instructional videos for the open web about 7 years ago, and especially since I started live streaming problem-solving sessions and office hours via Twitch, I’ve been meaning to give a run-down on the hows of the particular kind of video capture I do. (For some examples of the videos my streaming and capture produce, see my YouTube group theory playlist from this semester.)
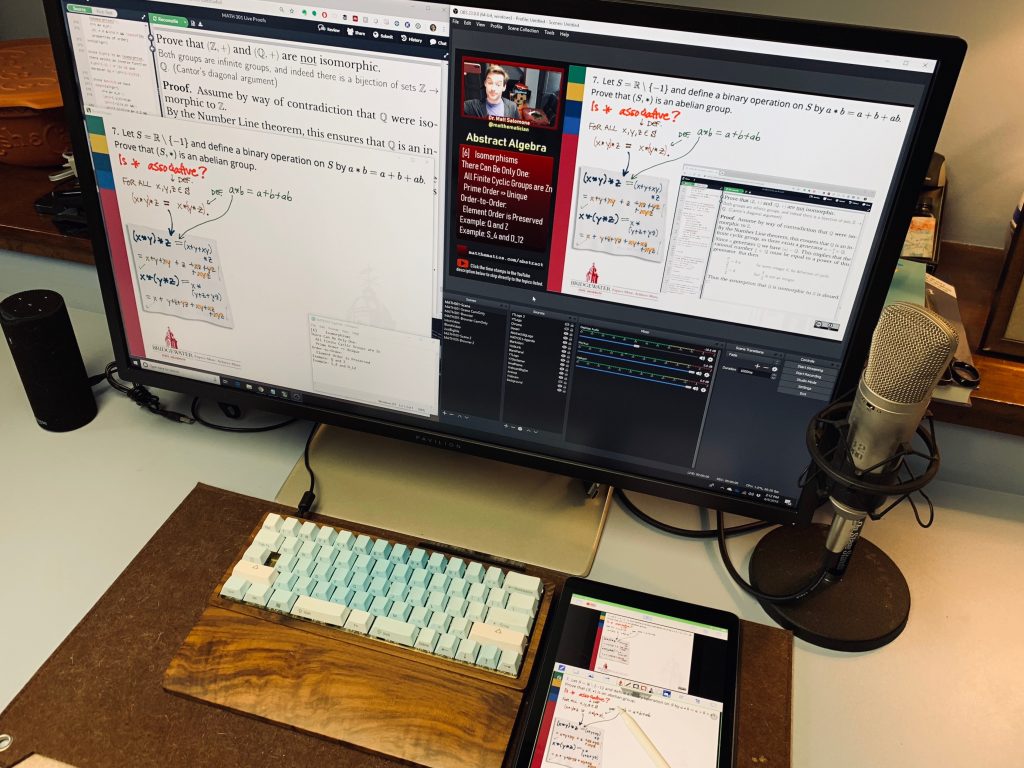
This is a quick snapshot of my setup to highlight some of the amazing hardware and software that make my videos and my streaming possible.

On My Desk (Hardware):
- PC. I’ve been a Mac user since graduate school, but crossed back over to PC for my home office this year because I wanted something easier to customize and upgrade. I prioritized graphics card power, RAM, and a speedy solid-state hard drive, and for less than half the price of my work-issued MacBook Pro, this handles real-time video compositing far, far better. Plus, plenty of screen real estate is super helpful for streaming.
- A “nice” microphone. Most important part of any educational video setup. Mine’s a Behringer B-2 Pro, connected via a Shure XLR-to-USB audio capture. This very microphone may or may not also have been part of the production of the Klein Four’s double-platinum 2005 album, Musical Fruitcake.
- An “okay” webcam. Not pictured here – it’s mounted above my monitor – is the ubiquitous Logitech HD Pro C920, one of the best values in a 1080p webcam I’ve seen. Since we’re using the separate microphone, all we need the webcam to do is feed video – not audio.
- iPad Pro. An iPad has been the one constant in my setup since day one, because it is a great platform for hand-written whiteboard work and it runs the killer app Doceri (see below) for the purpose. I started on an iPad 2 (long ago!) so fancy Apple Pencil support isn’t necessary – though it is nice.
- Personal green screen. ( http://thewebaround.com ) I don’t always use it, but this nifty tool lets me key out (delete) the background behind me so I can float neatly over my screen, just like a TV meteorologist. See this live stream for an example of the effect.
- Mechanical keyboard. Optional. There’s an open conjecture that any keyboard will suffice. But ask me about mine. (Plural.)

On My Desktop (Software):
This is where I’ve stirred together the most different tools over the years, and where the difference between recording for asynchronous viewing and sharing for live streaming is the biggest.
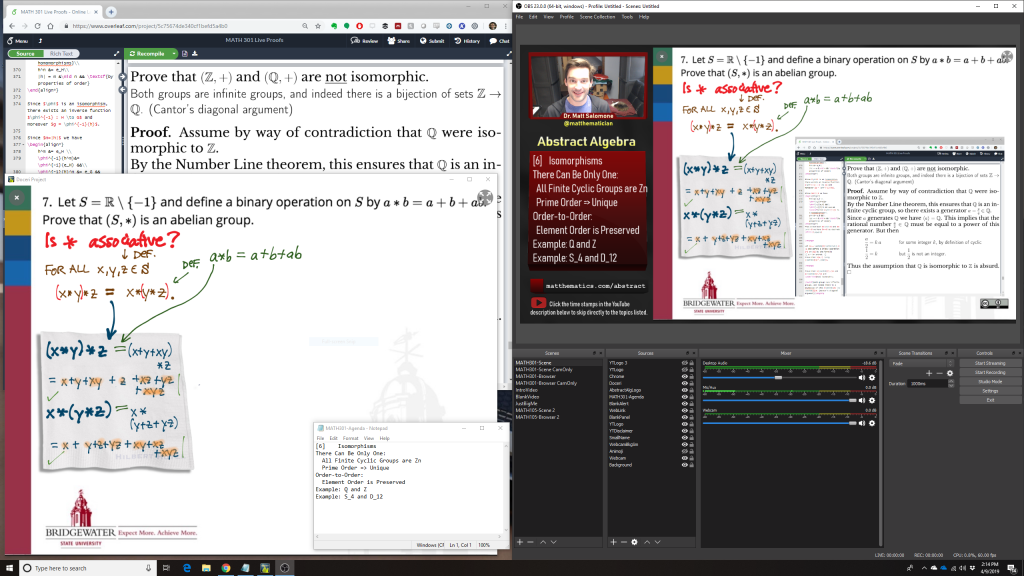
- Doceri interactive whiteboard app ( http://doceri.com ). Capturing & streaming. Hands down, the top of my list. Doceri is the one tool that I’ve run with the most in transforming my teaching. As you can see in the two pictures above, Doceri is an app on my iPad, connected via Wi-Fi to the PC that’s mirroring its display and feeding that display into a live stream. And mirroring whiteboard work onto a PC is only a fraction of what Doceri can do. It can also capture videos natively on its iPad app and share them to a variety of destinations including direct to YouTube, which I use to capture parts of my lectures during face-to-face classes. It can also, when connected via Wi-Fi to a PC, control that PC remotely from the app. Seriously – this app was worth every one of the few pennies I spent for it seven years ago. They’re not paying me to say that. But I wouldn’t turn them down if they wanted to.
- OBS Open Broadcasting Software ( http://obsproject.com ). Streaming only, though it’s capable of capture too. OBS is the Grand Central Station into which all my hardware and software feed, which composites the video and audio and pushes out a live stream. OBS is the software of choice for what I believe is a clear majority of streamers – most of whom stream video gameplay to places like Twitch, though it can also be connected to other live video services such as Periscope, Instagram Video, and Facebook Live. Because it’s open-source software, it comes with no cost and no developer support, but because it’s so widely used there is a large community of users who support one another’s technical questions in places like the OBS subreddit.
- Screencast-O-Matic ( http://screencast-o-matic.com ). Capture only. When I’m capturing a simpler video with only whiteboard and webcam, Screencast-O-Matic is a more lightweight and user-friendly alternative to OBS. Because of its ease of use and ability to quickly composite webcam and screen capture videos, this is a popular tool with many instructors of online and hybrid courses.
- Streaming canvas elements. (I got mine from the free site TwitchOverlay.) Streaming only. This package of image files includes things like the screen and textbox backgrounds, webcam frames, and other visual elements that inhabit my streaming canvas. Getting these all set up just so took a little bit of work, but once I had the basics down in OBS I could just duplicate that “scene” and tweak it to vary what’s being displayed (whiteboard, web browser, both, just webcam, etc.).
- Text editor. Streaming only. The “agenda” list of topics on my streaming canvas is read from a text file so that I can update it in real-time from a simple text editor.
- Live chat platform. Streaming only. If you’re streaming to a platform where your students can already log in and chat (e.g., using Facebook Live and they all are on Facebook) this is a given. But most of my students lack the Twitch account needed to engage in live stream chat natively through the platform. So instead, I monitor our course’s Slack channel that we already use as a learning management tool during live streams for student questions.
- Maine coon mix cat. Sleeping on the blanket in the background. Again, optional equipment but I don’t trust being catless on the internet.
- Social media presences. Streaming & capture. This goes without saying, but the more connected you are via social media and the web, the more open, searchable, and accessible your content can be. My accounts on Twitch (to host a public stream), YouTube (to catch and curate all my videos, including archives of live streams), Twitter (to share with the wider #AcademicTwitter and #MTBoS audiences), IFTTT (an automation tool that does things like send automatic tweets and Slack messages to students when I go live), and this very blog, add up – I hope – to give access to my stuff to whomever is interested. Including my students, yes, but by no means limited to them.
At least, that’s how I do it right now. Questions? Want to try some of this out for yourself? Looking for one single tool to test out to move your teaching into the video realm? ( Doceri. ) Hit me up here or on Twitter.
